Showing posts with label paper flowers. Show all posts

Wednesday, February 29, 2012

Pinwheel Spring Rosettes Magnet

Hola! Happy Leap Day everyone! Did you know that leap years go back to the days of Caesar, and were invented so that spring would fall at the same time every year?

In celebration of spring, I have a super easy and fast project I would like to share. It's a Pinwheel Spring Paper Rosette Magnet. I love making Paper Rosettes especially in different colors. They are really pretty and incredibly versatile. You can see few of my Paper Rosettes Inspiration Projects in my website.


I love seeing these Paper Rosettes incorporated into almost everything. From Party Event or Wedding Decor, Gift Wrapping and even on Shop Windows on the mall. I just love them! 


This Pinwheel Spring Rosettes Magnet is very easy to make. Check my Jinky'sCrafts website for the Free PinWheel Paper Rosette Tutorial .


I just added some MayArts ribbons at the edges of my strips and added coordinating buttons. I love the finished project. It is colorful and vibrant.. just in time for Spring decorations. 


I then added some magnetic strips at the back of my Paper Rosettes. Ok!  Pinwheel Spring Rosettes Magnet - DONE! 

Ok, I hope this simple project inspires you today. If you want to share your Spring projects or any kind of Paper Crafts or Fabric projects in my blog, you are welcome to do so. Just contact me and I can put you down as my Guest Blogger. 


Thursday, October 20, 2011

Coffin Paper Rosettes Bouquet

Hello Everyone!  I have a very festive project I would like to share. Paper Rosettes are very popular right now,they are popping everywhere, especially this Fall season. So when I received my Ebony & Ivory cardstock from Core'dinations and the Color Me Crazy collection by Petaloo, I knew exactly what to make for my May Arts blog post.


I decided to make a Coffin Paper Rosettes Bouquet. You will find my step-by-step photo tutorial below on how I made this Halloween project. The Core'dinations cardstock + Petaloo flowers + May Arts ribbons are a perfect compliment to each other. 


I used the Petallo Flowers to decorate the center of my Folded Paper Rosettes. I added Halloween Patterned paper to my plain cardstock to give colors to my flowers. Also, I covered my skewer sticks with Grosgrain/Center Polka Dot Band


Please click the image below to enlarge the step-by-step photos of how I made my Coffin Paper Rosettes Bouquet.

How did I make it?

Supplies: 

May Arts Ribbons: Skewer Sticks Ribbon, Corset Ribbon, Spider Web Ribbon
Cardstock : Ebony & Ivory by Core'dinations
Flowers : Color me Crazy by Petaloo
Cutfile : SVGCuts


Thanks a lot for stopping by. I hope you LIKE my projects and that I inspired you today! 


Monday, August 22, 2011

Fall Theme Explosion Box Invitation


Hello everyone! Hope you had a wonderful weekend! Many of you have been asking me to make tutorials for some of my favorite projects I listed on my MayArts Bio. So as a starter I will be sharing a tutorial today on how to make a Spider Web Ribbon Flower. But before that, let me share first this Fall Theme Explosion Invitation Box that I decorated with the Craft Lounge Nuts About You Fall Stamp set.


The Craft Lounge Nuts About You stamps was perfect for this Fall Theme Invitation. I stamped a few of the borders and colored them with markers.  Then, I used those to trim my 3-tier cake. I stamped and cut a few of the fall leaves to use as an accent to my cascading flowers. I love the way it turned out.


I used a glitter pen on the leaves and sprinkled some Irish Green Sparkly Fluff. I love how it instantly added sparkle and touch-ability to my fall leaves. And there is no heat required! Just sprinkle it onto any sticky surface, tap off the excess and let it dry! Its that simple!


I wrapped a Sheer ribbon around the bottom part of my 3-Tier cake. And then I stamped more leaves on the panels of my box.


Ribbons Used:

1.5" Faux Linen - 368-15-17
5/8" Sheer/Ombre - AE28
3" Satin Ribbon - KK16


Ok, as I promised, the folding technique I used before on my Framed Spring Ribbon Flowers were Flat Rose and Spider Web. Today, I will share with you the Spider Web Tutorial. This is the technique I used in making my Ribbon Flower that I used to adorn my Explosion Box Lid cover.


Spider Web Fabric Flower Tutorial


Click image to enlarge


Click Image to enlarge

You can find the complete step-by-step tutorial of my Exploding Box with 3-Tier Cake here.


Thanks a lot for stopping by. I hope you LIKE my projects and that I inspired you today! 

Friday, August 19, 2011

18th Birthday Philippines Tradition


In the Philippines where I grew up, 18th Birthdays are a cultural tradition for girls to celebrate their debut. It is a coming-of-age that is somewhat similar to the Quinceañera celebration of the Latin American girls. The only difference between Quinceañera and Philippine Debut is the age, like in the Phillippines, we celebrate it when woman turns 18 years old, while Quinceañera takes place on the 15th birthday of a Latin girl. 
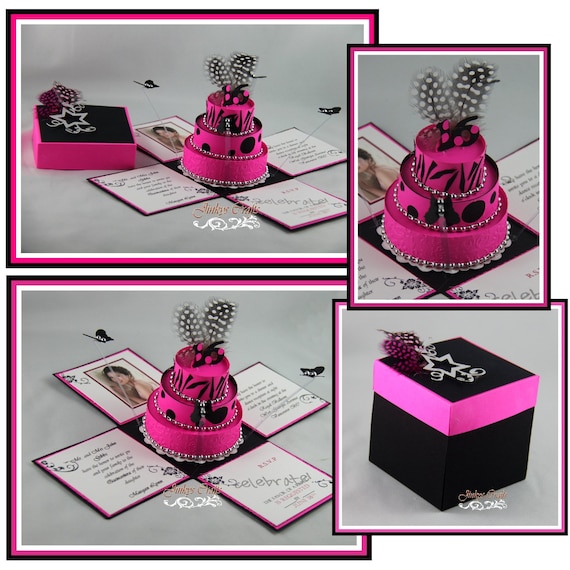
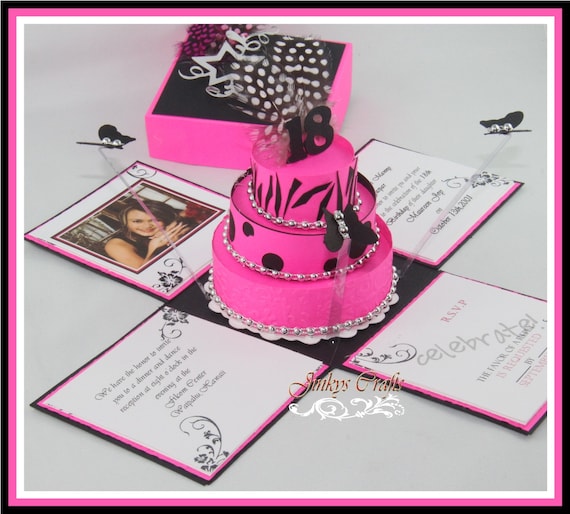
18th Birthday Exploding Box Invitation

Philippine Debutantes throw a large party with a completely hand-picked debut court of 18 pairs of people. 9 males and 9 females.The celebrant wears an extravagant ball gown while the celebrant's court usually wears a formal and uniform outfit chosen by the Debutante (celebrant). This is like a wedding party without the groom. 
Some of the traditional performances during the party are : 
  • Grand Cotilion
  • 18 Roses Dance
  • Father & Daughter Dance
  • 18 candles

18th Birthday Exploding Box Invitation with 3-Tier Cake

Invitation Wordings 
RSVP Panel of the Exploding Box Invitation


Thanks a lot for stopping by. I hope you LIKE my projects and that I inspired you today! 

Wednesday, August 17, 2011

5 Unique Paper Cake Decorations


Press On Candy

Hi Everyone! Hope you are having a great Wednesday morning. I just want to share 5 of my favorite  Paper Cake Decorations from Martha Stewart. It is always fun to offer your guest gorgeous desserts so here's some unique ideas from Martha S. that won't require you to slave in the kitchen and will not cost you your arm and leg. 
Trim with Paper
Top with Ribbon
Encircle with Leaves
Affix Faux Flowers
These Paper Cake Decorations are wonderful. I can not wait to try them on my
Exploding Box Invitations with 3-Tier Cake. 

Today, I just finished decorating a Sweet 16 Paper Cake for my Hot Pink & Black Sweet 16 Exploding Box Invitations. I would love to incorporate Martha S. ideas on my next project. I'm so excited. 

18th Birthday Invitation


Hot Pink & Black Sweet 16 Exploding Invitation Box 


Thanks a lot for stopping by. I hope you LIKE my projects and that I inspired you today! 


Tuesday, June 21, 2011

Cupcake Exploding Boxes & Bags

Hello everyone! This will be a quick photo post because I am extremely busy in preparing for my First Trade Show. That's right, I will have my first booth on the Quinceañera Panama Expo 2011  this coming Saturday and Sunday ( June 25-26). I am uber busy preparing stuff but I just want to share with you some of the projects I made for the Trade Show.


One of the designs I will be exhibiting is the Cupcake Exploding Box. This is for 15th Birthday/ 15 Años/Quinceañera, that's why I used the Hot Pink and Black color combinations. I also used Pink and Black animal prints designer paper here. 


If you happen to purchased my Exploding Box Invitation Tutorial. This is another great idea that you can do using the PDF Instructions. 


I also made some cupcake wrappers but I already gave it to my partner on the Expo. She's the owner of Delicatesse Postres. Please check out  Jenny's amazing Cakes and Sweets creations here


I also made some Cupcake Exploding Box Bags. The idea is very similar to the Exploding Box. This project is pretty easy to do. You need some basic supplies like Scor-Tape + Scor-Pal/Scoring Board /Crafters Ultimate Tool + Cardstock or Designer Paper + embellishments.


You can check the  Cupcake Exploding Bags tutorial on my site.

Friday, June 3, 2011

Carnation Crepe Paper Flower Tutorial


So, as I promised yesterday, here's the tutorial on how to make the Carnation Crepe Paper Flower I used on my Triangular Flower Vase project.


Carnation Crepe Paper Tutorial


1. Die-cut, punch-out or cut-out circular shape from a crepe paper ( or tissue paper ) about 15-20 pieces depending on your liking. If you do not have a punch or die-cut, use a decorative scissors.


2. Insert a floral wire or brad on the center to join all your cut-out circle together. 


3. Separate carefully the layer and pinch toward the center one at a time. Apply a little more pressure on your first layer and less pressure as you continue on the subsequent layers.


 4. Fluff the petals back out again until you form a perfect dome shape. DONE!


1ST Blogoversary Blog Candy Winners! 


Kimberly
Ok, really i just love the purse....so super cool, would love to give that to my daughter for her b-day...awesome.
www.justwordz.ca kimbob27 at hotmail dot com


Ces Guerrero
Hi Jinky, Happy 1st Anniversary! I find your crafts great to do and is something I can teach with my Relief Society sisters (ages 18 and beyond)for my church's Enrichment Activity. This is something they can do at home and at the same time earn from....
Third Prize :  Fabric Flower Tutorial 


Rhonda
Wow Jinky, You are so very generous with your absolutely stunning designs, I would be privoliged to even win 2nd or 3rd place as I just had to purchase your christmas tutorials when you first advertised them....

Congratulations to all the winners! 
I will be emailing you the tutorials later today. Please email me if you did not received your prize on your inbox. 

Thank you to everyone who participated!  You are all winners in my eyes!  There are many more blog candies to come, so stay tuned for more chances to win.

Please support me on my entry on MayArts and CAST YOU VOTE on my KANZASHI HEART WREATH if you have not done yet. Thanks a lot! 


Thursday, May 19, 2011

Jinky's Crafts 1st Anniversary Blog Candy

Hi everyone and welcome to Jinky's Crafts 1st Anniversary celebration Blog Candy. I can not believe it has been a year. I have learned so much since I started blogging. I have had a lot of fun and met cool Crafty ladies along the way. To all my followers and subscribers and to Crafter's Companion USA who first trusted me to be part of their awesome Design Team, thank you from the bottom of my heart.

In celebration of Jinky's Crafts 1st year Anniversary, I have prepared a Blog Candy contest for my dear followers, subscribers, guests and FB Fans.

Cool prizes up for grabs!

Third Prize :  Fabric Flower Tutorial 

Note( If you had already purchased these tutorials, you can check my ETSY SHOP and choose one Fabric  Flower Tutorial  as your prize).      


Note( If you had already purchased these tutorials, you can check my ETSY SHOP and choose one Tutorial  as your prize).       


First Prize: Pop-Up Purse w/ 3-Tier Cake Tutorial + Exploding Box Invitation w/ 3-Tier Cake.

           Note: ( If you had already purchased these tutorials, you can check my ETSY SHOP and choose 2  Tutorials as your prize).         


To be eligible to win ( please do any or all of the following )

1.   FIRST CHANCE to win - Follow this blog (select the "Follow" button to the top left) .

2.   SECOND CHANCE to win - Leave a comment under this post by May 31st, about how you would use these projects by May 31st.

3.   THIRD CHANCE to win!! Tweet, Send an Email to Friends, Blog about or Post on your Facebook about this giveaway.  (Just let us know you’ve done this by leaving another comment below this post with a link to your Twitter/Facebook post, Blog entry, or copy the email message you sent to your friends.)


The winner will be announced on Week1 of June.


Thank you for stopping by. Hope you have time to play along!