Showing posts with label jinkyscrafts. Show all posts

Wednesday, May 27, 2015

Pink and Gray Modern Wedding Invitations - Exploding Box Pop-Up Invites


Shade of Grey Invites


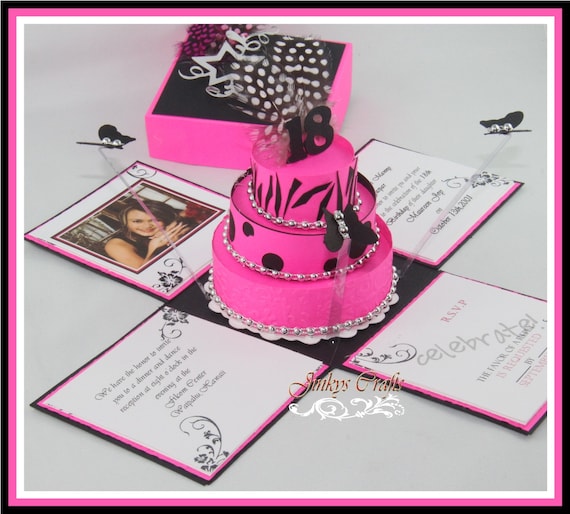
Jinky's Crafts Exploding Box Wedding Invitation in Pink and Grey color scheme are handcrafted in our own unique way. They're elegantly decorated with miniature doves and cut-outs. This Wedding Box Invitation is extra ordinary. When opened, the box explodes and reveals 4 special panels where the Wedding Wording is written. The top panel bears the main Wedding Wording Invitation.  The left panel is where the Church information and the right panel is the RSVP information. The Bottom Panel is the custom wedding calendar graphics. 

Pink and Grey Wedding Invitations

The Lid Cover of this Elegant Wedding Box Invitation is layered with luxury designer paper and embellished with satin ribbon with a custom Wedding Tag Label. Very simple yet elegant.

Custom Wedding Label Tags

The 3-Tier Paper Cake is used as a centerpiece and is luxuriously decorated with cascading miniature flowers with grey satin ribbon cake trimming. A custom cut-out wedding initial monogram of the Bride and Groom serves as the cake topper. It's so unique and beautiful. I love the final results of these invites.

Custom Handmade Wedding Centerpieces- Miniature Cakes
The size of this Exploding Box is a 3.5 x 3.5 inches cube. It can also be used as a Wedding Placecard, Gift Favor, or Gift Box. These can also be used as Sweet Sixteen Invitations, Quinceanera , or Bat Mitzvah Custom Invitations.

Please check out Gallery for more ideas, and contact us for any questions regarding a custom order. 


Friday, March 9, 2012

1st Birthday Exploding Box Album


Happy Weekend Eve everyone! I just want to share this cute 1st Birthday Exploding Box Album I made for my friend's little boy with you. Can you imagine I whipped this up in less than an hour?  Yes Ladies, that's when being Crafty comes handy, when you have a last minute gift giving need, you can just create in just minutes! Lol! 


I think most of us like to receive personalized gifts. This gift is 100% handmade… and you know what they say… “if it is handmade it is "Heart Made"”. Lol!

This Birthday Exploding Box Album is a lovely 3D papercraft that has 3 layers and 16 panels (inside and out)  that the Mom can decorate with special photos of her son in an unusual way.  There are all different types of adornments you can add, like stars, balloons, candles and more.


This Birthday Exploding Box has been called many things.  But all of them are good.  Some call it a Magic Box, a Surprise Box or a Explosion Box. No matter what you call it, this box is very unique because once you lift the lid it explodes and reveals multiple layers that can be decorated however you want. There is also a plenty of room in the middle, so it can be a space for a surprise gift. And for those who regularly follow my blog, you know that I love to decorate the middle area with a 3-Tier cake surrounded with floaties, just like my Exploding Box Invitations Designs


1st Birthday Exploding Box Album

What Mother out there is not going to love this extra-ordinary gift for their bundle of joy?

That's it my friends, Thanks for stopping by and hope I inspired you with my Birthday Exploding Box today! If you LIKE it, SHARE it, PIN it or Email it!  


Wednesday, February 29, 2012

Pinwheel Spring Rosettes Magnet

Hola! Happy Leap Day everyone! Did you know that leap years go back to the days of Caesar, and were invented so that spring would fall at the same time every year?

In celebration of spring, I have a super easy and fast project I would like to share. It's a Pinwheel Spring Paper Rosette Magnet. I love making Paper Rosettes especially in different colors. They are really pretty and incredibly versatile. You can see few of my Paper Rosettes Inspiration Projects in my website.


I love seeing these Paper Rosettes incorporated into almost everything. From Party Event or Wedding Decor, Gift Wrapping and even on Shop Windows on the mall. I just love them! 


This Pinwheel Spring Rosettes Magnet is very easy to make. Check my Jinky'sCrafts website for the Free PinWheel Paper Rosette Tutorial .


I just added some MayArts ribbons at the edges of my strips and added coordinating buttons. I love the finished project. It is colorful and vibrant.. just in time for Spring decorations. 


I then added some magnetic strips at the back of my Paper Rosettes. Ok!  Pinwheel Spring Rosettes Magnet - DONE! 

Ok, I hope this simple project inspires you today. If you want to share your Spring projects or any kind of Paper Crafts or Fabric projects in my blog, you are welcome to do so. Just contact me and I can put you down as my Guest Blogger. 


Friday, February 10, 2012

Tea Pot Exploding Box Invitation

Hello Fellow Crafters! Did you miss me? I know I have been MIA since Christmas. I was just so busy attending to my house guests and finishing some orders that I have not had time to do any blog posting.

Anyway, I am back! And today, I would love to show you this project I am currently working on. It is a Tea Pot Exploding Box. I received a request to design a Baby Shower Invitation. It is a Tea Party, so they love the Exploding Box idea  It's gonna be a Baby Girl, so I decided to combine all the inspirations and come up with this Tea Pot Exploding Box Baby Shower Invitation.

Tea Pot Exploding Box Invitations (Closed)

This is the initial design, I know I need to do a lot of tweaking but the good news is I am working on a Step-by-Step PDF Tutorial and Template which I am hoping to release this weekend.

Tea Pot Exploding Box Invitations (Open)

I would love your input on how to improve this design. Please let me know in the comment field your design tips.  


Being away from my Craft Room for almost 2 months is hard. But guess what!  I have a new Craft Room now! My Mother-In-Law, bought an office suite for me during her visit here in Panama. 
I LOVE & LIKE my MIL. She's very sweet and generous! I will be sharing some photos soon.  
Tea Party/Baby Shower Invitation
That's it my friends! Hope to share some more projects next week. If you are interested in the PDF Tutorial for this cute Tea Pot Exploding Box, please send me an email so you will be notified as soon as it is out. 

PS. Please check my website for more Exploding Box ideas. 

Wednesday, January 4, 2012

Elegant Matchbox Dresser Drawers

Happy New Year everyone! I can not believe it is 2012 already, where did 2011 go!?!

Today I have a mini storage and organization project for you. Just in time for those New Year's Resolutions to get organized this year. You might have seen several versions of Matchbox Dresser Drawers already but when I received my DCWV Lemon Flowers Paperstack, I knew exactly what I was going to make. 


As you can see, my Matchbox Dresser Drawers were decorated with the DCWV Lemon Flowers Paperstack. I love these paper collections, the combination of yellow and silver is very elegant. If you noticed, I also used string of bling around my dresser with the aid of Helmar Quick Dry Adhesive. I also used the Helmar Acid Free glue in adhering the DCWV paperpacks. It's my first time to use Helmar but I found it works great. It has a self-cap option. I don't know about you but I hate looking for caps once I am done using my glue. 


I also used the Zapdots 3D Double Sided Adhesive for my 3D Faux Flower Bouquet. 


I even made an ornament adorned with gathered MayArts ribbon. And a Kanzashi Flower Pearl Bracelet. Again, I used Helmar Quick Dry Adhesive to attach my pearls to my Kanzashi Flower. This glue is super strong and dries clear and works really good on fabric/ribbon. I used MayArts ribbon for my Kanzashi Flower.


How I did my project?
You can find the Step-by-Step PDF Tutorial for the Matchbox Dresser Drawers here.  

  • For the ornament: Die cut ornament shape. I used a Spellbinder die
  • Die cut gathered ribbon
  • Adhere ribbon to ornament using Helmar Quick Dry Adhesive
  • For the 3D Flower: Cut out flower from the DCWV Lemon Flowers Paperstack
  • Layer the 3D flower using the Zapdot 3D foam adhesive
  • For Kanzashi Flower: Cut 2"x2" square MayArts Ribbon. Fold in Kanzashi form. My previous tutorial can be found here. For Tsumami Kanzashi Flower you can check my Etsy Shop  or auto download link here.
  • Glue pearls Helmar Quick Dry Adhesive
  • String pearl beads. Adhere Kanzashi ribbon flower. Done!


Thanks a lot for stopping! Hope I inspire you today! 

Thursday, August 4, 2011

Designer Dresser With Mirror


Happy Thursday everyone! Today I would like to share a cool and functional project using one of the innovative tools from Crafter's Companion - The Boxer Board. That's correct my friends, this Dresser Drawer with Mirror was NOT DONE by any Electronic Tool or Die cutter but the Purple Plastic board from Crafter's Companion. 


This Dresser Drawer with Mirror was my take on the Drawer Box that Sara Davis demonstrated in the Ultimate Advanced Construction Techniques DVD. Sara Davis is the founder of Crafter's Companion and creator of Ultimate Pro- The Award Winning Tool.

My Inspiration 
I created these match boxes using the The Boxer Board, decorated with designer paper and add some Hitch Fasteners. This project is not just easy but it is also functional. I can use it to store some of my embellishments supplies. 
Matchbox Drawers
Don't forget to check how to win this Crafter's Companion Envelobox board.
Thanks a lot for stopping by. I hope you LIKE my projects and that I inspired you today! 

Monday, August 1, 2011

Crafter's Companion Envelobox Creator Giveaway


Hello Everyone! Can you believe it is already August? Yeah, time flies so fast. This month Crafter's Companion have an awesome giveaway. It's the Envelobox Creator. I am just lucky to be a Design Team member for Crafter's Companion USA. They carry wide variety of innovative products. One of my favorite is their innovative scoring tool- the Envelobox board


It may be hard to get excited about a bit of purple plastic but these boards are excellent. The boxer board has already proved its worth as I have made several already with great end results. With this amazing tool, you can make envelopes any size and any depth.  This is so perfect for bulky or specialize cards and 3-dimensional projects. Most of my Exploding Boxes and 3D projects are done using this awesome tool.


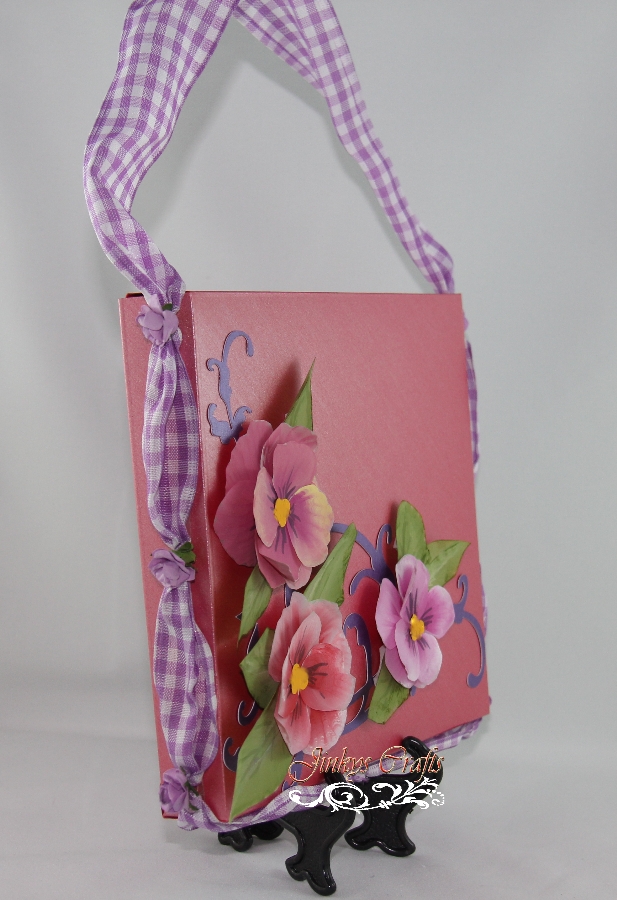
Envelobox Handbag


Stripe Tote Bag & Wedding Exploding Box Invitations

Turquoise Blue and Black Exploding Invitation Box


3D Lollipop Box

3D Lollipop Box

Treat Box + Treat Bag + Card ( 3-IN-ONE)
Not only are their products totally awesome, but they are a really generous company. They have given the entire design team an Envelobox to give away on their blogs to one lucky U.S. resident!


Here's how you can win this fabulous tool. You simply need to become a follower of Crafter's Companion USA challenge blog and then leave a comment on this post. You must do this to win. If you'd like a couple more chances to win just post about this giveaway on your blog or sidebar and become a fan of our Facebook page. For each of these things leave a separate comment here.


This giveaway will run for one week from August 1st through August 7th. There will be a winner chosen on Monday, August 8th.


Every single design team member is giving away a Envelobox board, so be sure to check out all their blogs as well to increase your odds of winning one of these fabulous tools.

Thursday, July 21, 2011

Stripe Tote Bag & Wedding Exploding Box Invitations

Hi Everyone! I am excited to share with you my latest project using The Boxer Ultimate Tool. This is very easy to make. I was able to achieve a perfect  stripes for my Tote Bag by scoring my panels in 1 inch intervals using The Boxer board.


There is something about Pink and Green in stripe form. The combination of these two colors are perfect.  From invitations to tote bags ...it's just beautiful! It is fun and bright for any themed party. 


Me and my Crafter's Companion Ultimate Tool is inseparable. I used it a lot on my projects.This tool really helps me in making perfect boxes and lids like the Pink and Green Wedding Exploding Box Invitation I recently finished designing. You can see more of my Exploding Box Design on my shop

Thanks a lot for stopping by. I hope you like my projects and that I inspired you today!  Stay tuned for more inspiration projects to come using your scoring board. 


Wednesday, July 6, 2011

Sunflower Theme Wedding Invitations

Japanese Style Box + Bi-Fold Sunflower Wedding Invitations
Happy Thursday Everyone! One more day, before the latest Paint Fusion launch. Today, I am excited to share with you a project I made using the Sheena Douglas Paint Fusion Sunflower Stamps set. Since it is summer time and everyone is enjoying the season, it inspired me to create this Handmade Sunflower Theme Wedding Invitation. Sunflower Theme Invitations radiate sunshine and happiness and nothing brings cheer and joy more than a Sunflower. 
Japanese Box - Open
Bi-Fold Sunflower Invitation- Closed
I had loads of fun creating this Bi-fold Wedding Invitation and Japanese Style Box. The main invitation, containing the important information (Wedding Date, Place, Bride and Groom, etc) is placed at the center. The Directions/Maps + RSVP + Reception cards are placed on the side panel or pocket.
Pocket - Fold Wedding Invitation - Open
I created a paper belly band to keep the Bi-Fold invitation card closed and a ribbon belly band to keep the box closed. My pocket fold invitation and Japanese Style box were decorated with coordinating ribbons and Sunflowers cut-out that I hand-painted using the Sheena Douglas Paint Fusion Sunflower Stamps set. I then layered my Sunflower Cut-out using the Double Adhesive Sided Foam Squares to get the 3D effect I want. To achieve a perfect folds and clean lines for my Japanese Style Box and Pocket-Fold Card, I used The Boxer & Envelobox Creator  Ultimate Tool
Japanese Style Box- Closed
Sunflower Event theme makes a bold statement. You can use this idea in making your birthday invitations, Quinceanera or Sweet 16th invites, the possibilities  are endless. Suggest this idea to a friend or family. It's fun and easy to make. 
Thanks a lot for stopping by. I hope you like my projects and that I inspired you today! 


Thursday, June 16, 2011

Window Card + Envelobox Hand Bag + Vellum 3D Flowers Tutorial


Hello everyone!  I am back with another 3D project. Today, I will be sharing not one but three projects. So brace yourself, I am warning you - there are lots of photos! You better grab a cup of coffee. LOL! Yes, today I will be sharing with you the Humphrey Window Card + the Envelobox Hand Bag + a Painted Vellum 3D Flower Tutorial.

Yes Friends, The Humphrey's are coming to Crafter's Companion USA! These cute little elephant  stamp sets are sooo darn cute! I forgot how much I love stamping! I used the "Flowers For You" on my Window Card, where Humphrey is carrying a huge bouquet of flowers. I just love it! This new set of stamps will be available on June 23rd on the Crafter's Companion website. Make sure not to miss the launch date!


I created the perfect casing for this beautiful Humphrey Window Card. I used my new Envelobox Creator Board to create the Envelobox Hand Bag. This is 1" deep and it is the perfect depth for my 3D Card. I used 11¾" x 11¾" cardstock here. You can certainly go deeper than 1", just use a larger size of cardstock. You can download the Envelobox Creator Sizing Guide here and the demo video here.


I attached a ribbon to serve as the handle around my Envelobox Hand Bag. I hand painted Pansy Flowers on a Vellum Paper using the latest Sheena Douglas Paint Fusion stamp set and these are used to adorn my Envelobox Hand Bag. You can scroll down below for the Painted Vellum 3D Flower Tutorial.


The new Sheena Paint Fusion stamps will be available at Crafter's Companion website on June 30th. Also, stay tuned for the Sneak Peek of these Stamp sets. These stamps will make a great addition to your collection. 


If you use a stylus or round object to shape your flower petals, it will give that extra dimension which makes your flower looks more realistic. I do not have a wide round stylus so I used the ribbon peg of the Ultimate Pro. It works great!


Since I was working with Vellum, I used the Collall 3D Kit for building up my flowers. This is a transparent silicone glue that dries as thick as it is applied, which makes it ideal for 3-dimensional creations.


Painted Vellum 3D Flower Tutorial 
Click Image to enlarge.


Thanks a lot for stopping by. I hope you like my projects and that I inspired you today!  -  Jinky