Showing posts with label May Arts Ribbon. Show all posts

Saturday, September 29, 2012

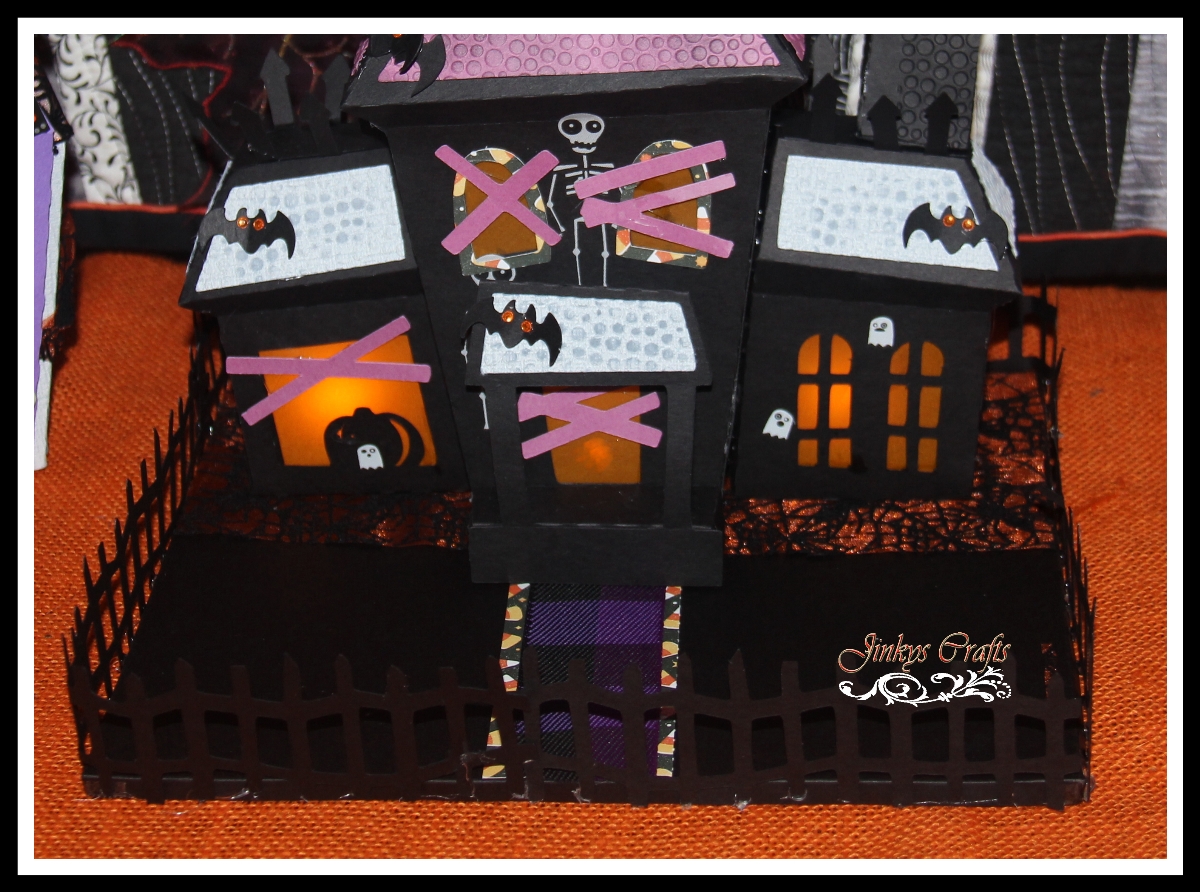
Flashback Project - Haunted House Luminary

Hello everyone! I would like to re-share this spooky  Haunted House Luminary project I created last year. This is  a great inspiration just in time for the Halloween, this is actually a follow-up to my Coffin Paper Rosettes Bouquet.


I used Ebony & Ivory cardstock from Core'dinations and couple of the Halloween ribbons from MayArts. I love the Spider Web ribbon (BX28) and the purple & black plaid (402-15-47). It did a great job of adorning my Haunted House Luminary. 


Supplies: 

May Arts Ribbons: Spider Web Ribbon
Cutfile : SVGCuts


Thanks a lot for stopping by. I hope you LIKE my projects and that I inspired you today! 

Friday, August 31, 2012

Halloween Decor - DIY Ribbon Flower Wreath


Hello and happy Friday everyone! Aren't you glad it 's TGIF?!. I am prepping for our trip tonight.  We are going to one of the Caribbean Island here in Panama. It is our 6th year Wedding Anniversary. But, before I leave, I want to share with you a festive project that can inspire you for the weekend. A Halloween Wreath.


This is a very fast and easy project. I really enjoyed making this Halloween Decor Craft. It is a little bit dressy, fun and it makes a cute halloween decor.

Here's the quick how to:

  • wrap 12″ foam wreath in Halloween wide ribbon by MayArts
  • make 3 different kinds of flowers using fabric, ribbon and paper
  • wrap candles with Halloween ribbon and another contrasting  color ribbon


For my fabric  flowers: I used the gathering technique and Frilly flower technique.


Lastly, I just wanna share the place we are heading to celebrate our wedding anniversary! I am so excited to play in the water under the sun with my wonderful husband of 6 years. Happy weekend everyone and please help me pray for good weather! 


Thanks a lot for stopping by and hope I inspired you today!

Friday, April 27, 2012

Mother's Day Teapot Exploding Box


Hi everyone! Jinky here to share with you this unique Mother's Day Teapot Exploding Box. I personally believe that Mother's Day is one of the most important occasions on the calendar year. We should be all grateful to our mothers because without their guidance and wisdom, it will be hard for us to be where we are right now. In Latin America, where I currently reside part-time, Mother's Day is declared as a National Holiday. Everyone makes it a point to show how much they love their mothers by taking them to shopping malls, restaurants and spas.


My project is inspired by Mother's Day.  The supplies I received from MayArts were just in time for this project. MayArts teamed up with Authentique, I used their Delightful Collection for my Exploding Teapot Box. Their designer paper is perfect for my project. I also embellished my 3-tier square cake with gold trimmings, and for the lid, I used Crochet/Velvet Center Ribbon by MayArts . I used my templates for the Graduation Exploding Box 3-Tier Cake + my Teapot Exploding Box (Jinky'sCrafts templates).


With the help of acetate strips, I added some butterfly "floaties" around my 3-tier cake. Also I printed Mother's Day Invitation wordings, die cut and attached to my panels. Using my Cricut machine, I cut a "Mother's Day" script and that serves as my topper. 


I love how it turned out. The Teapot Box is very versatile.  You can use it as a Mother's Day Gift Box, a scrapbook layout and much more. For me, I opted into using the Teapot Exploding Box as an Invitation. It is modern and extra-ordinary.


That's it my friends. I hope I inspired you with my project today.


Friday, April 13, 2012

Song Birds Paper Wreath

Hello everyone! When I received my Creative Imaginations designer papers, I knew exactly what I was going to do for my MayArts post. I decided to make a Paper Wreath using MayArts Ribbons and the Song Birds Creative Imagination designer paper.

Song Birds Paper Wreath Image


The ribbons I used to wrap my Styrofoam is my stash from my Spring Topiary project. I did not have enough of one color to wrap the whole area of the Styrofoam wreath so I decided to mix all of the different colors I have. I think it's very colorful and pretty.


I cut the outline of my bird image from the Song Birds collections from Creative Imagination. I created my 3D Sunflower using my Cricut machine. I applied some wet glue in the middle and poured ground coffee to make the improvised center of my sunflower. My wreath does not smell like sunflowers.  It smells like coffee! lol!


Can you believe that I whipped this up in just 15 minutes?! Yes ladies, This project is super easy, super cheap, and so much fun to do. Try this yourself and I know it will surely brighten up your front door and it is a cheery image to come home to. 


 Materials used :
May Arts Ribbons (349-47, 349-46, 349-22, 349-27, 349-28, 363-10) 
Song Birds Designer Paper - Creative Imaginations

Thanks a lot for stopping by. I hope I inspired you today!~ Jinky

Wednesday, February 29, 2012

Pinwheel Spring Rosettes Magnet

Hola! Happy Leap Day everyone! Did you know that leap years go back to the days of Caesar, and were invented so that spring would fall at the same time every year?

In celebration of spring, I have a super easy and fast project I would like to share. It's a Pinwheel Spring Paper Rosette Magnet. I love making Paper Rosettes especially in different colors. They are really pretty and incredibly versatile. You can see few of my Paper Rosettes Inspiration Projects in my website.


I love seeing these Paper Rosettes incorporated into almost everything. From Party Event or Wedding Decor, Gift Wrapping and even on Shop Windows on the mall. I just love them! 


This Pinwheel Spring Rosettes Magnet is very easy to make. Check my Jinky'sCrafts website for the Free PinWheel Paper Rosette Tutorial .


I just added some MayArts ribbons at the edges of my strips and added coordinating buttons. I love the finished project. It is colorful and vibrant.. just in time for Spring decorations. 


I then added some magnetic strips at the back of my Paper Rosettes. Ok!  Pinwheel Spring Rosettes Magnet - DONE! 

Ok, I hope this simple project inspires you today. If you want to share your Spring projects or any kind of Paper Crafts or Fabric projects in my blog, you are welcome to do so. Just contact me and I can put you down as my Guest Blogger. 


Monday, February 20, 2012

DIY Box Wedding Invitations

Happy President's Day for all my US followers and Happy Family Day to all my  Canadian friends and followers  from the East Coast.

Today, I would like to share with you a DIY Box Wedding Invitations I made for MayArts Stampendous blog week.

Silk Boxes are one of the newest trends for Soon to be Wed Couples to send there Wedding Invitations. But Silk Boxes are expensive to buy.  So why not try a cheaper paper box to pack your wedding invites. Here's a cheaper version of the Wedding Box Invitation.


I was inspired by the  Fire & Ice  Engagement Party Invitation of Miss Emily Thorne on the TV show Revenge. Do any of you watch that show? Well, it is a show on TV that is aired every Wednesday on ABC.  Miss Emily Thorne, the lead character was engaged to an all-American boy of privilege from the the Hamptons- Daniel Grayson.  I tried to find an actual photo of the Engagement Party Invitation online but no luck.  If you guys find it, please let me know. 

The How To of my DIY Wedding Box Invitation:

  • Emboss it with red embossing powder and then ink it with "Fired Ink"  distress ink. Cut outline.
  • Color the center with yellow markers and add red self adhesive rhinestones. 
  • Print the invitation wordings, then stamp a Swirl and heat emboss using the Stampendous Aged Green Embossing Enamel. Add some green  self adhesive rhinestones. 
  • Add a red Satin Pleats MayArts ribbons on the card and the black Satin Pleats in the sides of my box. 

  • Add foam dots at the back of  the cut-out flower and layer it on top of the embossed swirl to create a 3D effect. 
  • Add another layer of red cardstock. 
  • Create a band for the box using  Stampendous border, add a red Satin Pleats  MayArts Ribbon. 
  • Add some feathers and flower for accent. Done. 


I love how it turned out. I think the big Stampendous Floral Stamps + the May Arts ribbon gives a great impact on this project.

Fire & Ice Inspired Wedding Card


Fire & Ice Inspired Wedding Box Invitation

Thanks for stopping. I hope I inspired you today. - Jinky

Monday, February 13, 2012

Valentine Lollipop Gift Favor

So, tomorrow is Valentines Day. Happy Heart's Day to everyone! I know I was supposed to be posting Valentines Project but as you know, I just got back to my routine last week.

Anyways, I have a great but super easy + fast project to share today. It is a Valentine Lollipop Gift Favor. I just score and glue some cardstock and add MayArts Ribbons. Voila! I just finished a quick Valentine treats.


How To Make A Valentine Lollipop Gift Favor

>  Take 2½” x 6¼” cardstock and score the horizontal side at 2½”, 3 “ , 5½” and 6”
>  Trace and cut (half-part) of heart shape for the box top section.
>   Pre-fold score lines. Using a whole puncher, make a hole for your lollipop sticks. 
 >  Get your treats (chocolates or cookies) and attach the lollipop stick.
>   Insert your lollipop stick on the hole, glue side of your box to close. 
>   Wrap a ribbon around your lollipop stick glue to secure. Decorate! Done!  


You can use this simple technique in any occasion. It is FAST, CHEAP and EASY. You can see the Holiday Lollipop Bouquet posted in my blog last year here.


So, what are you waiting for. Grab your cardstock and glue and start crafting. You still have time till tomorrow. Haha!

Enjoy!

Wednesday, January 25, 2012

Flying Airships Gift Sets

Hello everyone. I am back! Sorry that I have been MIA for the past few weeks. I have been working on my new site and I have a big Wedding Exploding Box Custom order I am trying to finished. But today, I  am excited to share a few projects I made recently using the Flying Airships by Hero Arts and adorned with some MayArts Ribbons. When I received these new 2012 Hero Arts Cling Stamps, I decided to make a bag and a bookmark.


Here's how I did it:

I used each of the Hero Arts "Flying Airship" Cling Stamp sets.


For my  Bag :  I stamped G45  paper and heat embossed it with black embossing powder. I then created a tag to adorn my bag, I stamped my chipboard with Memento Brown and colored it with markers and distressed it with "Fired Brick" Distress Ink. I used the "A Proper Gentleman" paper stack from  Graphic 45.


For my Bookmark:

I cut enough GrosGrain MayArts Ribbon and attached ribbon clasps on both ends. Also I added hardware clips as a charms. I stamped and colored a gift tag and cut the outline so it matches the width of my ribbon. I then adhered the gift tag to my Ribbon Bookmark.

This project is so easy and fast. It is a great gift set for the men in your life.


Thanks for stopping by and hope I inspired today.


Thursday, October 6, 2011

Fishing Caddy & SWALK Card

Hello everyone! Hope you are all having a great week.  I have a manly project I would love to share with you today. We all know that projects with flowers and ribbons is meant for girls, so when I received the new  SWALK  Best Pals unmounted Stamp Set I knew exactly what would I make. 


I used the Crafter's Companion Ultimate Tool in making the Caddy. I meant to add a handle that's why the hardware has been attached already. Also, I thought it would be nice to put a gummy worms and candy bugs inside the box. I just did not have enough time. 
Here's also matching card I made for the Crafter's Companion USA Challenge blog .

S.W.A.L.K. Best Pals Stamp Set


The Fishing Caddy is large enough to package some manly gifts like small fishing items, ties, bake goods or even CDs or movies ( just remove the divider of the box).  Please see the quick tutorial on how I created this box below. 

Click image to enlarge Fishing Caddy Mini - Tutorial


RECIPE for Card and Fishing Caddy
Ink: Memento Black, Copic Markers
Ribbon: MayArts
Tools: Ultimate Craft Companion , protractor, xacto knife, Paper cutter


Thanks a lot for stopping by. I hope you LIKE my projects and that I inspired you today! 


Thursday, September 8, 2011

OA PICNIC CADDY


This will be at the top of the post until the release date of the E-Book
Be sure to scroll down.


Hello Everyone! I won't be posting the Day 2 of my 12 Days of Handmade Christmas Crafts today. I am still decorating my Day 2 project. Hopefully, I can post it tomorrow.

But I have a different project I would like to share, this was a project I created for my MayArts scheduled blog post.  It's a Picnic Caddy which I decorated with the October Afternoon’s Campfire product line.


When I received this October Afternoon Campfire kit, I knew exactly what I was going to do. I have made this Picnic Caddy in the past but I did not have the right designer paper back then.  So, I had to create my own plaid paper. This time, I have all the well coordinated Designer Papers, stickers, and embellishments courtesy of October Afternoon and of course May Arts Ribbons.

Ribbons used :

Leaves - BY66
Burlap String - SM10


This Picnic Caddy is so fast and easy to make. I had fun decorating this box. Please scroll down below for the step-by-step photo tutorial.


This project can also be used as your craft caddy. You can use it to store your markers, paint brushes, scissors and other craft tools you have.  As long as it will fit the box. 

PICNIC CADDY TUTORIAL

Click image to enlarge


Thanks a lot for stopping by. I hope you LIKE my projects and that I inspired you today! JINKY


Thursday, August 4, 2011

Handmade Kindle Case with Ribbons


Hello everyone! I have a new addiction these days...Ribbon Manipulation. I think ribbons are the best embellishments on any Paper Crafts. 


Today, I would love to share with you this Handmade Kindle Case that was adorned by some ribbons. It was made out of fabric. The ribbon technique I used in decorating my Handmade Kindle Case was gathering technique. It is pretty easy, all you have to do is sew a straight stitch by hand or by sewing machine and gather the stitch and form it into a flower.


Since I am one of the Design Team Member of May Arts Ribbons. All the ribbons I used in this project are May Arts Ribbon collections of RRR.

Ribbon Used in this project:

Gathered Flower              -Fucshia Silk
Belly Band                      - Fucshia Silk, Moss Silk
Leaves                            - Leaves, Lime Green
Flower Buds                   - Sheer Ombre Lavender/ Pink
                                      - Sheer Ombre Peach/ Yellow
Ruffle Belly Band           - Sheer Ruffle Edge Fucshia


I love how the ribbons pop-out with the black background. This luxurious color combination is perfect for a stylist Kindle Case, don't you think?


I want to thank RRR for inviting me to play with their awesome ribbons this month! I have some ribbons left so please stay tuned as I am looking forward of making more of ribbon project in coming days. 


Thanks a lot for stopping by. I hope you like my projects and that I inspired you today!  Stay tuned for more inspiration projects to come using your scoring board.