Wednesday, February 29, 2012

Pinwheel Spring Rosettes Magnet

Hola! Happy Leap Day everyone! Did you know that leap years go back to the days of Caesar, and were invented so that spring would fall at the same time every year?

In celebration of spring, I have a super easy and fast project I would like to share. It's a Pinwheel Spring Paper Rosette Magnet. I love making Paper Rosettes especially in different colors. They are really pretty and incredibly versatile. You can see few of my Paper Rosettes Inspiration Projects in my website.


I love seeing these Paper Rosettes incorporated into almost everything. From Party Event or Wedding Decor, Gift Wrapping and even on Shop Windows on the mall. I just love them! 


This Pinwheel Spring Rosettes Magnet is very easy to make. Check my Jinky'sCrafts website for the Free PinWheel Paper Rosette Tutorial .


I just added some MayArts ribbons at the edges of my strips and added coordinating buttons. I love the finished project. It is colorful and vibrant.. just in time for Spring decorations. 


I then added some magnetic strips at the back of my Paper Rosettes. Ok!  Pinwheel Spring Rosettes Magnet - DONE! 

Ok, I hope this simple project inspires you today. If you want to share your Spring projects or any kind of Paper Crafts or Fabric projects in my blog, you are welcome to do so. Just contact me and I can put you down as my Guest Blogger. 


Wednesday, February 22, 2012

Graduation Pyramid Exploding Box


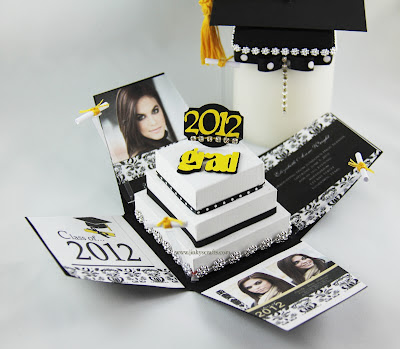
Can you believe it? It is almost March! It is  time to start thinking about those milestone events of 2012 like graduation! I am pleased to present one of my latest Exploding Box designs. I created this Pyramid Exploding Box as a Graduation Announcement/Invitation. It is to honor and celebrate the class of 2012 graduates. My niece Katherine happens to be one of The Graduates this year.


This Pyramid Exploding Box Graduation Invitation is one of a kind. It is a very elegant, modern, innovative and personalized Graduation Invitation.  This design can be easily customized with your personal details and photo. 


Check Jinky'sCrafts store for the Kit and PDF Tutorial. Yes, we make it easy for you. We created a kit for your DIY Handmade Graduation Invitation or Announcement. 


For those candidates for graduation, parents or guardians of the graduate, I hope that this newest Jinky'sCrafts Graduation Exploding Box Invitation design inspires you and can help you to get ready for this exclusive celebration. 


Separate yourself and make this event memorable, be unique and try making this Pop-Up Graduation Invitation. I am sure, your recipient will be delighted to receive the good news or invitations and would not forget this memorable day because these boxes can serve as your Graduation Party Favor at the same time. 


Monday, February 20, 2012

DIY Box Wedding Invitations

Happy President's Day for all my US followers and Happy Family Day to all my  Canadian friends and followers  from the East Coast.

Today, I would like to share with you a DIY Box Wedding Invitations I made for MayArts Stampendous blog week.

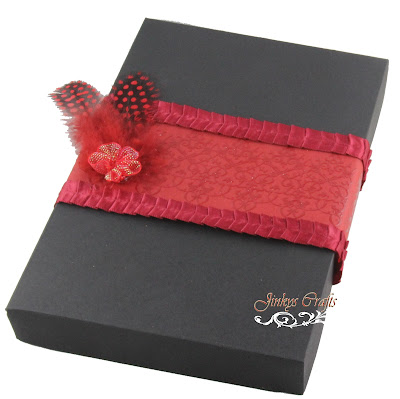
Silk Boxes are one of the newest trends for Soon to be Wed Couples to send there Wedding Invitations. But Silk Boxes are expensive to buy.  So why not try a cheaper paper box to pack your wedding invites. Here's a cheaper version of the Wedding Box Invitation.


I was inspired by the  Fire & Ice  Engagement Party Invitation of Miss Emily Thorne on the TV show Revenge. Do any of you watch that show? Well, it is a show on TV that is aired every Wednesday on ABC.  Miss Emily Thorne, the lead character was engaged to an all-American boy of privilege from the the Hamptons- Daniel Grayson.  I tried to find an actual photo of the Engagement Party Invitation online but no luck.  If you guys find it, please let me know. 

The How To of my DIY Wedding Box Invitation:

  • Emboss it with red embossing powder and then ink it with "Fired Ink"  distress ink. Cut outline.
  • Color the center with yellow markers and add red self adhesive rhinestones. 
  • Print the invitation wordings, then stamp a Swirl and heat emboss using the Stampendous Aged Green Embossing Enamel. Add some green  self adhesive rhinestones. 
  • Add a red Satin Pleats MayArts ribbons on the card and the black Satin Pleats in the sides of my box. 

  • Add foam dots at the back of  the cut-out flower and layer it on top of the embossed swirl to create a 3D effect. 
  • Add another layer of red cardstock. 
  • Create a band for the box using  Stampendous border, add a red Satin Pleats  MayArts Ribbon
  • Add some feathers and flower for accent. Done. 


I love how it turned out. I think the big Stampendous Floral Stamps + the May Arts ribbon gives a great impact on this project.

Fire & Ice Inspired Wedding Card


Fire & Ice Inspired Wedding Box Invitation

Thanks for stopping. I hope I inspired you today. - Jinky

Tuesday, February 14, 2012

Eiffel Valentine Card

Happy Valentine's Day to all! May you all have a wonderful day with your loveones! :)

I was invited to a Valentine's Day Luncheon Party today so this will be a quick post. I made this Eiffel Tower Card for my DH for just 15 minutes. Yeah, that FAST!


I used the Wall Decor and more..and Graphically Speaking Cricut Cartridge. I then added May Arts  Ribbon and some bling. I did not really put a lot of effort into this card but I think it comes out
beautifully. Clean and Simple card.


My DH appreciated it, so that's all that matters. We really did not plan anything today but we are thinking of celebrating Heart's Day on the weekend.


That's it my friends, I hope this simple project inspire you today! Have fun!

Monday, February 13, 2012

Valentine Lollipop Gift Favor

So, tomorrow is Valentines Day. Happy Heart's Day to everyone! I know I was supposed to be posting Valentines Project but as you know, I just got back to my routine last week.

Anyways, I have a great but super easy + fast project to share today. It is a Valentine Lollipop Gift Favor. I just score and glue some cardstock and add MayArts Ribbons. Voila! I just finished a quick Valentine treats.


How To Make A Valentine Lollipop Gift Favor

>  Take 2½” x 6¼” cardstock and score the horizontal side at 2½”, 3 “ , 5½” and 6”
>  Trace and cut (half-part) of heart shape for the box top section.
>   Pre-fold score lines. Using a whole puncher, make a hole for your lollipop sticks. 
 >  Get your treats (chocolates or cookies) and attach the lollipop stick.
>   Insert your lollipop stick on the hole, glue side of your box to close. 
>   Wrap a ribbon around your lollipop stick glue to secure. Decorate! Done!  


You can use this simple technique in any occasion. It is FAST, CHEAP and EASY. You can see the Holiday Lollipop Bouquet posted in my blog last year here.


So, what are you waiting for. Grab your cardstock and glue and start crafting. You still have time till tomorrow. Haha!

Enjoy!

Teapot Exploding Gift Box

Hi all, today we have a Guest Designer. Kathy from DoubleK-Krafts made this beautiful Teapot Exploding Gift Box. This is her version on my recently released Teapot Exploding Box Tutorial.


I love how she decorated her box. She even added a little knob on top of the lid. So cool!


Since this is an Exploding Box, you can practically use it in many ways. I like what she did, she used the Teapot Exploding Box to house another cute little gift box. It is like a box-inside-a box type of thing.


So guys, the Teapot Exploding Box PDF Tutorial is now available. I know I promised to get it done on the weekend. The PDF download includes 5 pages + 18 photos of step-by-step instructions and Templates.

I would like to Thank Kathy for doing an inspiration project for Jinky's Crafts. If anyone here would love to guest post and use my Templates, just send me an email. I would love to see different versions of my Templates.

Here's my very 1st version of the Teapot Exploding Box Template. Stay tuned for more inspiration projects.
Tea Party Exploding Box Invitation
Thanks a lot for stopping by today. Happy Crafting!

Friday, February 10, 2012

Tea Pot Exploding Box Invitation

Hello Fellow Crafters! Did you miss me? I know I have been MIA since Christmas. I was just so busy attending to my house guests and finishing some orders that I have not had time to do any blog posting.

Anyway, I am back! And today, I would love to show you this project I am currently working on. It is a Tea Pot Exploding Box. I received a request to design a Baby Shower Invitation. It is a Tea Party, so they love the Exploding Box idea  It's gonna be a Baby Girl, so I decided to combine all the inspirations and come up with this Tea Pot Exploding Box Baby Shower Invitation.

Tea Pot Exploding Box Invitations (Closed)

This is the initial design, I know I need to do a lot of tweaking but the good news is I am working on a Step-by-Step PDF Tutorial and Template which I am hoping to release this weekend.

Tea Pot Exploding Box Invitations (Open)

I would love your input on how to improve this design. Please let me know in the comment field your design tips.  


Being away from my Craft Room for almost 2 months is hard. But guess what!  I have a new Craft Room now! My Mother-In-Law, bought an office suite for me during her visit here in Panama. 
I LOVE & LIKE my MIL. She's very sweet and generous! I will be sharing some photos soon.  
Tea Party/Baby Shower Invitation
That's it my friends! Hope to share some more projects next week. If you are interested in the PDF Tutorial for this cute Tea Pot Exploding Box, please send me an email so you will be notified as soon as it is out. 

PS. Please check my website for more Exploding Box ideas.